
Wraps have become a beloved staple in many kitchens around the globe, cherished for their versatility and convenience. Whether you’re looking for a quick lunch, a satisfying dinner, or a fun finger food for a gathering, wraps can easily adapt to fit any occasion. Among the myriad of wrap recipes out there, Cheesy Garlic Chicken Wraps stand out with their irresistible combination of gooey cheeses, savory garlic, and tender chicken. These wraps not only deliver on flavor but also provide a comforting, hearty meal that can please picky eaters and food adventurers alike.
The allure of Cheesy Garlic Chicken Wraps lies in their rich, cheesy filling complemented by the aromatic punch of garlic. The delightful balance of textures and flavors makes them a go-to recipe for busy weeknights, meal prep, or casual gatherings with family and friends. With minimal prep time and straightforward steps, even novice cooks can whip up these wraps in no time, making them an ideal choice for anyone looking to enjoy a homemade meal without the fuss.
Understanding the Ingredients
To make the Cheesy Garlic Chicken Wraps truly shine, it’s essential to choose high-quality ingredients that work harmoniously together. Let’s break down each component of this flavorful dish:
Chicken
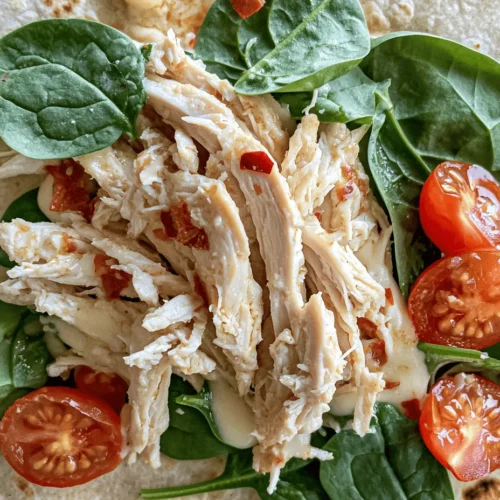
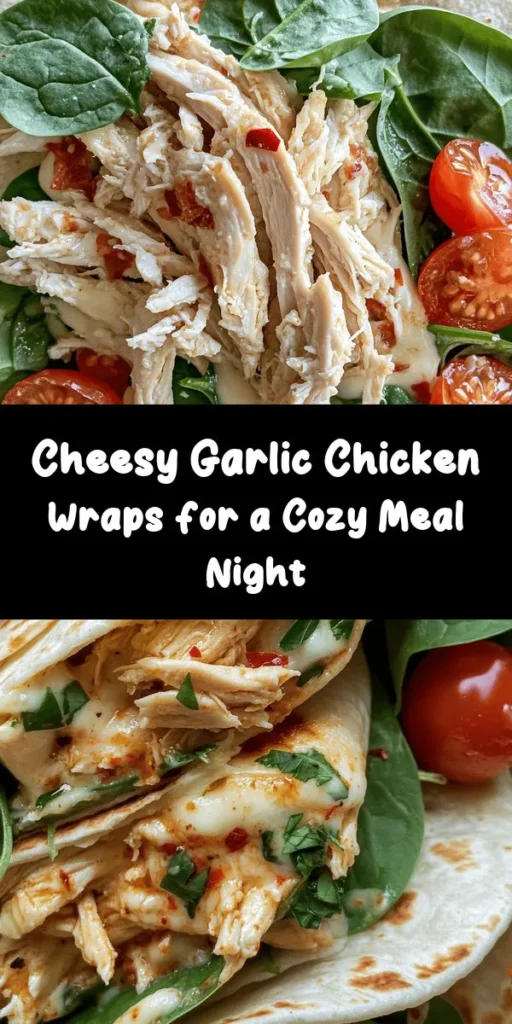
The foundation of the Cheesy Garlic Chicken Wraps is, of course, the chicken. For optimal flavor and texture, it’s best to use cooked and shredded chicken. This not only infuses the filling with a juicy, savory taste but also provides a tender texture that makes each bite enjoyable. Whether you opt for rotisserie chicken for convenience or cook your own chicken breast, ensuring the chicken is well-seasoned will enhance the overall flavor of the wraps.
Cheeses
Cheese is the star attraction of this recipe, and a combination of mozzarella, cream cheese, and Parmesan works wonders to create a creamy, cheesy filling.
– Mozzarella: Known for its gooey melt, mozzarella cheese adds a delightful stretchiness to the wraps. Its mild flavor pairs perfectly with the other components, allowing the garlic and spices to shine through.
– Cream Cheese: This ingredient is crucial for achieving that creamy consistency. Cream cheese not only binds the filling together but also adds a rich, tangy profile that complements the other cheeses. It’s essential to allow the cream cheese to soften at room temperature before mixing, which helps in easily blending it with the other ingredients.
– Parmesan: For a touch of sharpness and depth, freshly grated Parmesan cheese is a fantastic addition. Its nutty flavor enhances the overall taste and adds a subtle crunch, making every bite more enjoyable.
Garlic
No Cheesy Garlic Chicken Wrap would be complete without the robust flavor of garlic. Fresh garlic is the best option here, as it offers a more vibrant taste than powdered varieties. When sautéed, garlic mellows out and becomes sweet, infusing the filling with a savory aroma that is both comforting and mouthwatering. It’s advisable to finely mince the garlic to ensure it is evenly distributed throughout the filling.
Spinach and Cherry Tomatoes
To brighten up the dish and add nutritional value, fresh spinach and cherry tomatoes are included in the filling.
– Spinach: This leafy green is packed with vitamins and minerals, making it a healthy addition to the wraps. It adds a pop of color and a mild earthiness that balances the rich, cheesy filling.
– Cherry Tomatoes: These bite-sized tomatoes bring a delightful burst of sweetness and acidity to the dish. Their vibrant color not only enhances the visual appeal of the wraps but also provides a refreshing contrast to the creamy filling.
Spices
The final touch to elevate the flavor profile of the Cheesy Garlic Chicken Wraps comes from a blend of spices.
– Dried Oregano: This herb adds an aromatic depth to the filling, complementing the garlic and cheese beautifully. Oregano is a classic pairing with chicken, bringing a Mediterranean flair to the wraps.
– Garlic Powder: For an extra punch of garlic flavor, a dash of garlic powder can be included. While fresh garlic is preferred for its vibrant taste, garlic powder can enhance the overall garlic experience without overpowering the dish.
– Red Pepper Flakes: If you enjoy a bit of heat, consider adding optional red pepper flakes to the filling. This spice can elevate the flavor and add a kick, making the wraps more exciting.
Preparation of Cheesy Garlic Chicken Filling
Now that we’ve explored the ingredients, it’s time to dive into the preparation of the Cheesy Garlic Chicken Filling. This step is crucial, as it sets the stage for the delicious wraps to come. Here’s a step-by-step guide to ensure your filling is perfectly seasoned and well-combined:
1. Sauté Fresh Garlic: Start by heating a tablespoon of olive oil in a skillet over medium heat. Once the oil is hot, add the minced garlic. Sauté for about 1-2 minutes until the garlic becomes fragrant and lightly golden. Be careful not to burn it, as burnt garlic can impart a bitter taste.
2. Combine Chicken and Spinach: In a large mixing bowl, combine the cooked and shredded chicken with the sautéed garlic and fresh spinach. If you prefer your spinach to be wilted, you can add it to the skillet with the garlic for a minute before mixing it into the bowl.
3. Add Cheese and Seasonings: Next, add the softened cream cheese, shredded mozzarella, and grated Parmesan to the bowl. Sprinkle in the dried oregano, garlic powder, and optional red pepper flakes. Use a spatula or large spoon to gently mix the ingredients together until the cheese is evenly distributed and the spinach is well incorporated.
4. Check Consistency: The filling should be creamy and cohesive, with all components fully blended. If the mixture feels too thick, you can add a splash of chicken broth or a bit of olive oil to loosen it up. The goal is to achieve a spreadable consistency that will hold together well when assembled into wraps.
5. Taste and Adjust: Before moving on to assembly, taste the filling and adjust the seasoning as needed. Depending on your preference, you may want to add more salt, pepper, or spices to enhance the flavor.
Assembling the Wraps
With the Cheesy Garlic Chicken Filling ready, it’s time to assemble the wraps. This is where you can get creative and tailor each wrap to your liking. Here’s a detailed guide on how to handle the tortillas and create perfect wraps:
1. Choose Your Tortillas: Start with your preferred type of tortilla. Flour tortillas are a popular choice for their softness and flexibility, but whole wheat or corn tortillas can also be used for a healthier option. Make sure the tortillas are fresh, as stale tortillas can tear easily during assembly.
2. Warm the Tortillas: To make the tortillas more pliable, warm them slightly. You can do this by placing them in a dry skillet over low heat for about 30 seconds on each side or wrapping them in a damp paper towel and microwaving them for 15-20 seconds. This step helps prevent tearing and makes rolling easier.
3. Scoop the Filling: Once the tortillas are warmed, lay them flat on a clean surface. Using a generous scoop of the Cheesy Garlic Chicken Filling, place it in the center of the tortilla. Be careful not to overfill, as this can make rolling difficult.
4. Fold and Roll: Start by folding the sides of the tortilla inward over the filling. Then, using your hands, begin to roll the tortilla tightly from the bottom up, tucking the filling in as you go. Make sure to keep the wrap snug but not overly tight, as the cheese will melt and expand during cooking.
5. Secure the Wraps: If you’re planning to cook the wraps immediately, you can place them seam-side down in a skillet or on a baking sheet. If preparing them for later, consider wrapping each assembled wrap in foil or parchment paper to keep them fresh.
With the Cheesy Garlic Chicken Filling prepped and the wraps assembled, you’re well on your way to enjoying a delicious meal. In the next part of this article, we will cover the cooking methods to achieve that perfect golden-brown exterior and melty cheese interior, along with some serving suggestions and tips for customization. Stay tuned for more mouthwatering details!

Choosing the Right Size Tortilla and Layering for Optimal Filling
When it comes to making Cheesy Garlic Chicken Wraps, the size of the tortilla plays a crucial role in the success of your dish. The ideal tortilla size for wraps generally ranges between 10 to 12 inches in diameter. A larger tortilla allows you to fill it generously without the risk of tearing. Conversely, smaller tortillas can lead to overstuffing, which may result in messy spills when you attempt to roll them.
To lay out your tortilla for filling, place it flat on a clean, dry surface. This will help you achieve a firm base for your ingredients. It’s essential to keep the filling centralized, ideally a couple of inches from the edges. This spacing allows for easier rolling and provides enough room for the tortilla to fold over without bursting at the seams.
Layering the Filling and Vegetables
The key to a successful wrap lies in how you layer your fillings. Start with a base layer of cheese, which acts as a glue to hold the other ingredients in place. Follow this with your seasoned chicken, ensuring it’s evenly distributed. Next, add any vegetables you choose, such as spinach, bell peppers, or onions. To prevent spills during the rolling process, it’s wise to keep your fillings within the center of the tortilla. Avoid piling ingredients too high, as this can lead to uneven rolling and potential breakage.
Consider using a combination of textures and flavors in your layers. For instance, the creaminess of cheese can balance well with the crunch of fresh vegetables, making every bite more enjoyable. A good rule of thumb is to use no more than 1 cup of filling per tortilla, allowing enough space to roll without difficulty.
Rolling and Toasting the Wraps
Achieving the perfect roll is an art form that can elevate your Cheesy Garlic Chicken Wraps from ordinary to extraordinary. Start by folding the sides of the tortilla inward, covering the filling slightly. Then, begin rolling from the edge closest to you, tucking the filling in as you go. Use your fingers to ensure that the filling remains tucked inside the wrap. Visual cues to look for include a snug fit without any visible gaps, which will ensure the wrap holds together well.
Once rolled, it’s time to toast your wraps for that crispy exterior. Preheat a skillet over medium heat; this ensures that the wrap will brown evenly without burning. Add a small amount of oil—about 1 tablespoon of olive oil or butter—to the skillet. This not only adds flavor but also aids in achieving a golden crust.
Place the wraps seam-side down in the skillet, allowing them to toast for 3 to 4 minutes on each side. Be sure to monitor the heat; a too-hot skillet can burn the wraps while leaving them cold inside. A well-toasted wrap will have a crispy surface while the inside remains warm and gooey.
Serving Suggestions
To truly elevate your Cheesy Garlic Chicken Wraps, consider garnishing them with fresh herbs like cilantro or parsley for a pop of color and flavor. Additionally, a sprinkle of Parmesan cheese on top can enhance the overall taste, making each bite even more irresistible.
When it comes to dipping sauces, the options are plentiful. A zesty ranch dressing complements the savory elements of the wrap beautifully, while a homemade garlic aioli can amplify the garlic flavor. If you prefer something with a kick, a spicy salsa or a chipotle mayo can add a delightful heat.
These wraps can be served as a main dish, accompanied by a side salad or roasted vegetables for a wholesome meal. Alternatively, they make fantastic snacks for gatherings or parties. Cut the wraps into smaller sections, arrange them on a platter, and watch them disappear!
Nutritional Information
Understanding the nutritional value of your Cheesy Garlic Chicken Wraps can help you make informed decisions about your diet. Each wrap can contain approximately 400-500 calories, depending on the ingredients used. The primary contributors to this caloric content are the chicken, cheese, and tortilla.
A typical wrap can provide about 30 grams of protein, making it a great option for those looking to increase their protein intake. Additionally, the chicken and vegetables contribute essential vitamins and minerals, such as vitamin A, vitamin C, and calcium.
If you’re looking for a healthier version, consider these substitutions: use low-fat cheese to reduce fat content without sacrificing flavor, or opt for whole grain tortillas for added fiber. You can also add more vegetables to the filling to boost the nutritional profile further.
Conclusion
Cheesy Garlic Chicken Wraps are not just a delicious meal; they’re an experience that brings joy into the kitchen. This recipe is perfect for anyone seeking a quick, easy-to-make dish that doesn’t compromise on flavor. Whether enjoyed as a hearty lunch, a satisfying dinner, or a fun snack, they embody the perfect blend of flavors and textures.
We encourage you to try out this recipe as part of a balanced diet. The flexibility of the ingredients allows you to personalize each wrap to your liking, making this a fun cooking adventure. As you explore the world of cooking, remember that sharing homemade meals with friends and family is one of life’s greatest pleasures. Enjoy the process, savor the flavors, and create lasting memories with your delicious Cheesy Garlic Chicken Wraps!